Testlink
简介
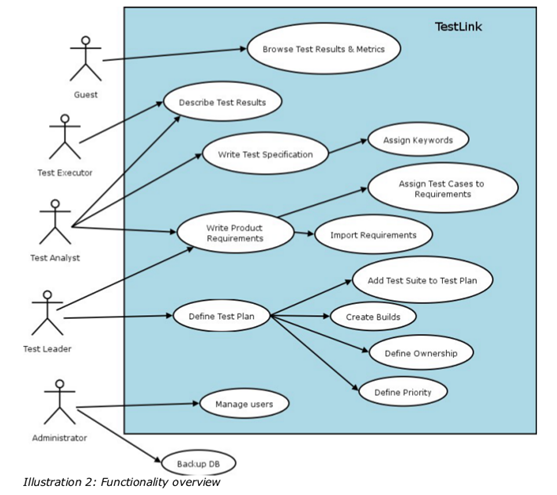
TestLink 是一套测试管理系统。
由Teamst ( http://www.teamst.org/ )开发和维护。
TestLink中的测试概念
Test Plan
一次测试活动,隶属于Test Project。
创建及分配测试任务,记录测试结果。
可能的属性:
- Summary/Scope
- Features to be tested
- Features to not be tested
- Test criteria (to pass tested product)
- Test environment, Infrastructure
- Test tools
- Risks
- References (Product plan or Change request, Quality document(s), etc.)
Test Case
测试用例,最基本的测试任务。
可以分类到各自的Test Suite中。
- Identifier of a Test Case is assigned automatically by TestLink, and can not be changed by users. This ID composes from Test Project prefix and a counter related to the Test Project in which the Test Case is created.
- Title: could include either short description or abbreviation (e.g. TL-USER-LOGIN)
- Summary: should be really short; just for overview, introduction and references.
- Steps: describe test scenario (input actions); can also include precondition and clean-up information here.
- Expected results: describe checkpoints and expected behaviour of a tested product or system.
- Attachments: could be added if configuration allows it.
- Importance: Test designer could set importance of the test [HIGH, MEDIUM and LOW].
- Execution type: Test designer could set automation support of the test [MANUAL/AUTOMATED]
- Custom fields: Administrator could define own parameters to enhance Test Case description or categorization. Large custom fields (more than 250 characters) are not possible. But information could be added into parent Test Suite and referred via custom fields. For example you can describe Configuration ‘standard’, ‘performance’, ‘standard_2’ and refer via CF to this labels.
Test Project
对应公司的产品和项目。
Test Project之间相互独立,不共享数据。
Test Specification
每个Test Project仅有一个Test Specification,有Test Suite和Test Case组成。
TestLink系统中的角色
The default types are: Guest, Test Designer, Senior tester, Tester, Leader and Administrator but custom roles can also be created.
使用指南
Test Project
- Active属性
- 取消勾选Active,该项目在系统中被关闭,不能继续使用。
Test Specification
A Test Project has just one Test Specification.
TestLink breaks down the Test Specification structure into Test Suites and Test Cases.
- 技巧:
建议不要删除Test Case和Test Suite。如果有些功能在新版本中被取消,建一个Test Suite “已取消的”或者“版本0.1”,将不用的用例移到这个Test Suite中。
Requirements Specification
一个Test Project可以有很多Requirements Specification(文档),其中包含树形的结构的Requirements。
注意:虽然支持多层树形结构,但是导出文档时,可能只有2层。
创建Requirements Specification
文档ID(或,文档标识,Document ID)在Test Project中必须唯一。
创建Requirement
文档ID(或,文档标识,Document ID)在Test Project中必须唯一。
使用技巧
批量导入测试结果
- 参考:
- 安装目录/docs/tl-file-formats.pdf “Import / export file formats” 2.8 Results import
- 按照导入结果的格式编写结果XML
- 在TestLink执行用例,选择任一一个用例,在右边的操作区中点击“import XML Report”
- 在弹出的对话框中上传之前编写好的XML文件,上传后TestLink会显示导入的结果,如果成功会显示详情情况,哪些用例被设置成什么结果
简单的例子:
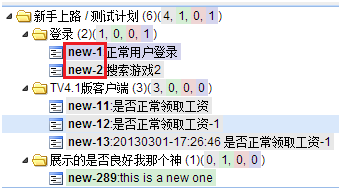
1 2 3 4 5 6 7 8 9 10 11 12 13 14 15 | <?xml version="1.0" encoding="UTF-8"?> <results> <testcase external_id="new-11" > <result>f</result> <notes>functionality works great.. </notes> </testcase> <testcase external_id="new-12" > <result>f</result> <notes>functionality works great.. </notes> </testcase> <testcase id="100"> <!-- ID: internal/DB id ---> <result>p</result> <notes>functionality works great </notes> </testcase> </results> |
其中result的值可以是:p、f、b
分别对应pass, fail, block
其中external_id在TestLink界面中可以看到对应用例的id,如下图
使用约定及工作流
使用约定
如果用例已经被在Test Plan执行,不要删除它! 设置为不激活状态即可。
Admin
testlink的配置文件
<testlink-home>/config.inc.php
技巧
关闭游客注册
在config.inc.php中设置$tlCfg->user_self_signup为FALSE,
$tlCfg->user_self_signup = FALSE;
汉化
字符串资源在如下目录中,修改其中文本文件就可以了。
testlink-1.9.5\locale\zh_CN\strings.txt
整合Redmine到TL1.9.5
Redmine支持RESTful API来向第三方程序开放,TL1.9.5支持REST的方式连接Redmine。
一) 创建BTS配置
1 | 在主页面 TestProject > Issue Tracker Management创建到Redmine的连接。 |
二) 填写Redmine的连接配置
Issue tracker 名称,用户自己命名。
Type 选择 redmine (interface: rest)
Configuration的示例:
1 2 3 4 5 6 | <issuetracker> <apikey>2cdc47a34681dec19fd4cab20ef1f59146339372</apikey> <uribase>http://192.168.10.101:8082/redmine</uribase> <!-- Project Identifier is NEEDED ONLY if you want to create issues from TL --> <projectidentifier>newbie</projectidentifier> </issuetracker> |
- 说明:
- apikey是目标redmine系统的访问凭证,在redmine中设置后取得。
- 如何取得apikey:
- 设置需要redmine系统管理员身份,打开REST API支持。在Administration -> Settings -> Authentication 中Enable REST API 。
- 打开后,在redmine页面右上角进入用户信息界面(redmine/my/account页面),在页面中即可找到API KEY(API访问键)。
参考:
http://www.redmine.org/projects/redmine/wiki/Rest_api的Authentication一节。
三) 关联到项目
在项目设置中关联到已有的Redmine设置,
Test Project > Test Project Management,然后编辑某个项目。
四) 为Fail的TestCase关联bug
在Case执行页面,Fail的测试记录行中的“Bug Management”中点击关联图标 (Link Existent Issue),关联制定ID的BUG。
- 注意:
Redmine2.1.4的issue url格式是:http://127.0.0.1//redmine/issues/<bug-id>
而TestLink 1.9.5中的URL格式是:http://127.0.0.1//redmine/issues/show/<bug-id>
所以需要修改下TestLink,修改方法如下:
testlink-1.9.5\lib\issuetrackerintegration\redminerestInterface.class.php
1 2 3 4 | function completeCfg() $this->cfg->uriview = $base . 'issues/show/'; 修改为 $this->cfg->uriview = $base . 'issues/'; |
五) 在TestLink中添加Redmine-bug
在Case执行页面,Fail的测试记录行中的“Bug Management”中点击创建图标(),自动创建BUG,创建到之前在Testlink配置的Redmine项目中,例如,<projectidentifier>newbie</projectidentifier>。
该功能在testlink-1.9.5\lib\issuetrackerintegration\redminerestInterface.class.php中实现,其addIssue($summary,$description)函数向Redmine传递数据,在目标项目中创建bug。这个函数对summary和description执行了htmlentities编码,结果Redmine2.1.4没解码,报错说标题太长。。。两个开源项目同步很有问题啊。。。去掉这个htmlentities函数就好了。
用这个方法创建的BUG显的很奇怪,因为是内容都是TestLink自动生成的,
例如,
1 2 3 4 5 6 7 8 | 标题为“/newbie/非功能性要求/NB-1:升级覆盖安装测试 - Executed ON (ISO FORMAT): 2013-02-18 10:56:01”,bug描述为:
Execution ID: 12
Tester: admin
Test Plan: preload_android
Build: preload_1.0
Executed ON (ISO FORMAT): 2013-02-18 10:56:01
Execution Status: failed
|
所以啊,还是手动创建BUG再关联吧!!要么自己把这个功能完善下,哈哈。
设置TestLink中生成文档中的公司标识
在config.inc.php中设置:
1 2 3 | /* [GENERATED DOCUMENTATION] */ 块中设置 $tlCfg->document_generator->company_name = 'Your Company Name’; $tlCfg->document_generator->company_copyright = ‘2009 © TestLink Community’; |
设置使用Company logo
默认的logo存放在:testlink-1.9.5\gui\themes\default\images\company_logo.png
可以修改原来的logo文件,也可以在config.inc.php中修改配置
1 | $tlCfg->company_logo = 'company_logo.png'; |
禁止filter查询后输出function和sql信息
使用过滤器搜索后,testlink1.9.5会打印出function、sql信息到页面,影响正常浏览。
解决办法:
在testlink-1.9.5\lib\functions\testproject.class.php 中注释掉打印语句
1 2 | 1) 2599 行 echo __METHOD__ . '::' . $method2call . '<br>'; 2) 2710 行 echo $sql; |
打开文件上传功能
配置third_party/fckEditor的filemanager
如何配置在
在编辑器中,插入图片的地方,上传文件和图片。
不要上传包含中文的文件,文件名会出现乱码。
文件上传后存放位置设置
1 2 3 | testlink-1.9.5\third_party\fckeditor\editor\filemanager\connectors\php\config.php 中设置 $Config['UserFilesPath'] = '/userfiles/' ; |
表示上传的文件会放在根目录下的userfiles文件夹下,也就是htdoc/userfiles下。
关闭自动创建bug功能
修改 testlink.1.9.5\lib\execute\execSetResults.php
1 2 | 将$gui->tlCanCreateIssue = method_exists($its,'addIssue'); 改为:$gui->tlCanCreateIssue = false; |
执行用例时候,就看不到创建bug的图标了。
patch & bugfix
1.9.5版本保存测试结果“save and move to next”无法移到下一个用例
解决方法:
修改lib/execute/execSetResults.php中处理 save_and_next的代码
在执行如下语句前,需要检查 $args->testcases_to_show 是否为null
1 2 3 4 5 6 7 8 9 10 11 12 | while (!is_null($nextItem) && !in_array($nextItem['tcase_id'], $args->testcases_to_show))
{
$nextItem = $tplan_mgr->getTestCaseNextSibling($args->tplan_id,$nextItem['tcversion_id'],$args->platform_id);
}
改成
if(!is_null($args->testcases_to_show))
{
while (!is_null($nextItem) && !in_array($nextItem['tcase_id'], $args->testcases_to_show))
{
$nextItem = $tplan_mgr->getTestCaseNextSibling($args->tplan_id,$nextItem['tcversion_id'],$args->platform_id);
}
}
|
说明:
该方法在execSetResults.php测试过,未全面测试。
嘿嘿,也只看了这一个php文件,其他没研究。
1.9.5版本无法查看inactive的test plan
refer to:http://www.teamst.org/forum/viewtopic.php?f=11&t=7168
解决方法:
1 2 3 4 5 6 7 8 9 10 11 12 13 14 | planEdit.php
function initializeGui(&$dbHandler,&$argsObj,&$editorCfg,&$tprojectMgr)
{
...
//FIX BEGIN
//REMOVE
//$guiObj->tplans = $argsObj->user->getAccessibleTestPlans($dbHandler,$argsObj->tproject_id,
// null,array('output' =>'mapfull'));
//ADD
$guiObj->tplans = $tprojectMgr->get_all_testplans($argsObj->tproject_id);
//FIX END
...
}
|
1 2 3 4 5 6 7 8 | planView.php
//FIX BEGIN
//REMOVE
//$gui->tplans = $args->user->getAccessibleTestPlans($db,$args->tproject_id,null,array('output' =>'mapfull'));
//ADD
$gui->tplans = $tproject_mgr->get_all_testplans($args->tproject_id);
//FIX END
|