Install Gerrit on Tomcat_Apache on Windows
安装步骤
下载Gerrit
https://code.google.com/p/gerrit/
下载下来是个war包,例如:gerrit-2.8.1.war
创建Gerrit用的数据库(MySql)
1 2 3 4 5 | CREATE DATABASE ReviewDB; ALTER DATABASE ReviewDB charset=latin1; CREATE USER 'gerrit'@'localhost' IDENTIFIED BY 'gerrit'; GRANT ALL ON ReviewDB.* TO 'gerrit'@'localhost'; FLUSH PRIVILEGES; |
charset=latin1 , 字符集先设置成latin1,原因有2个说法:
- gerrit.war init 安装出错
- mysql的主键长度不能超过1000个字节,用utf8(1个字符3字节)会严重减少描述的字符。
中文支持配置,创建完数据库后就进行配置,参见中文支持部分。
创建Gerrit网站(包含git repo)
java -jar gerrit.war init -d /path/to/your/gerrit_application_directory
如下示意图,执行的是:java -jar gerrit-2.8.1.war init -d e:\gerrit\gerrit_server
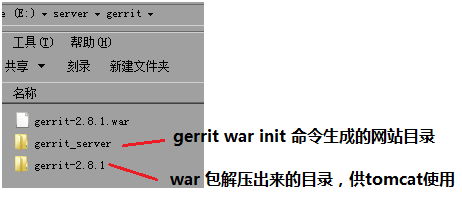
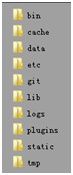
执行后,gerrit_server目录结构类似如下:
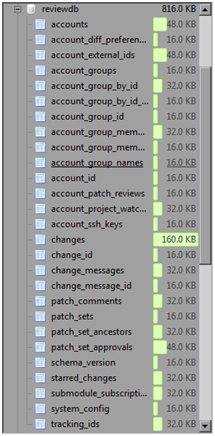
数据库结构类似如下:
gerrit_server/etc/gerrit.config
文件类似如下:
1 2 3 4 5 6 7 8 9 10 11 12 13 14 15 16 17 18 19 20 21 22 23 24 25 26 | [gerrit] basePath = git canonicalWebUrl = http://localhost:8080/ [database] type = mysql hostname = localhost port = 3306 database = reviewdb username = root [auth] type = HTTP httpHeader = Authorization [sendemail] smtpServer = smtp.126.com smtpServerPort = 25 smtpUser = your-email@126.com from = your-email@126.com [container] user = ethan javaHome = e:\\sdk\\Java\\jre6 [sshd] listenAddress = *:29418 [httpd] listenUrl = http://*:8080/ [cache] directory = cache |
配置Tomcat
- 注意:Gerrit 2.8.1 不能在 tomcat6 上跑,只能在 tomcat7 以上。
解压war包到某个目录,例如:E:\server\gerrit\gerrit-2.8.1
创建 <tomcat-home>/conf/Catalina/localhost/gerrit.xml
1 2 | <?xml version="1.0" encoding="utf-8"?> <Context path="" docBase="E:/server/gerrit/gerrit-2.8.1"/> |
此时,可以将gerrit.config的设置,该为:
1 | canonicalWebUrl = http://localhost:8080/gerrit |
创建DB Source
<tomcat-home>/conf/context.xml中添加:
1 2 3 4 5 6 7 8 9 | <Resource name="jdbc/ReviewDb" type="javax.sql.DataSource" driverClassName="com.mysql.jdbc.Driver" username="gerrit" password="gerrit" url="jdbc:mysql://localhost:7655/ReviewDB?autoReconnect=true" auth="Container" /> |
同时记得将 mysql-connector 从 gerrit_server/lib/mysql-connector-java-5.1.21.jar 拷贝到 <tomcat-home>/lib
运行tomcat下的gerrit
http://localhost:8080/gerrit就可以看到页面了。
配置帐号(结合Apache的Http Basic Authorization)
配置Apache成为tomcat的反向代理
在httpd.conf加入:
1 2 3 4 5 6 7 8 9 10 11 12 13 14 15 16 17 18 19 20 21 22 23 24 25 26 27 | Listen 7666
<VirtualHost *:7666>
ErrorLog "logs/error_log"
CustomLog "logs/access_log" vcommon
ProxyRequests Off
ProxyVia Off
ProxyPreserveHost On
<Proxy *>
Order deny,allow
Allow from all
</Proxy>
<Location /gerrit/login/>
AuthType Basic
AuthName "Gerrit Code Review"
AuthUserFile passwords
AuthGroupFile group.txt
Require group review
Order Deny,Allow
Allow from all
</Location>
ProxyPass /gerrit/ http://127.0.0.1:8080/gerrit/
ProxyPassReverse /gerrit/ http://127.0.0.1:8080/gerrit/
</VirtualHost>
|
创建用户名和密码
上述httpd.conf中 AuthUserFile passwords,执行apache根目录下的passwords文件保存用名和密码。
使用如下命令创建用户,命令会自动弹出来要求输入密码。
htpasswd -c Filename username
创建用户组
上述httpd.conf中 AuthGroupFile group.txt 指明组文件,文件格式为:
group-name: user1 user2
例如:group.txt
review: wi
设置用户权限
Require group review
修改gerrit.config 配置
启动Apache并访问gerrit
将gerrit.config的设置,该为:
canonicalWebUrl = http://localhost:7666/gerrit/
并从该地址访问。
Gerrit 服务器迁移
将备份的数据库导入后,需要在执行下配置:
java -jar gerrit-2.8.1.war init -d /opt/server/gerrit/gerrit-2.8.1-site
1 2 3 4 5 6 7 8 9 10 11 12 13 14 15 16 17 18 19 20 21 22 23 24 25 26 27 28 29 30 31 32 33 34 35 36 37 38 39 40 41 42 43 44 45 46 47 48 49 50 51 52 53 54 55 56 57 58 59 60 61 62 63 64 65 66 67 68 69 70 71 72 73 74 | ---------------------------------------------------------- *** Gerrit Code Review 2.8.1 *** *** Git Repositories *** Location of Git repositories [git]: *** SQL Database *** Database server type [mysql]: Server hostname [localhost]: Server port [(mysql default)]: Database name [ReviewDB]: Database username [gerrit]: Change gerrit's password [y/N]? *** User Authentication *** Authentication method [LDAP/?]: LDAP server [ldap://localhost]: LDAP username [cn=Manager,dc=duzzle,dc=com]: Change cn=Manager,dc=duzzle,dc=com's password [y/N]? Account BaseDN [ou=people,dc=duzzle,dc=com]: Group BaseDN [ou=people,dc=duzzle,dc=com]: *** Email Delivery *** SMTP server hostname [smtp.126.com]: SMTP server port [(default)]: SMTP encryption [NONE/?]: SMTP username [testdirector8@126.com]: Change testdirector8@126.com's password [y/N]? *** Container Process *** Run as [root]: Java runtime [/usr/lib/jvm/java-1.7.0-openjdk-1.7.0.75.x86_64/jre]: Upgrade /opt/server/gerrit/gerrit-2.8.1-site/bin/gerrit.war [Y/n]? Copying gerrit-2.8.1.war to /opt/server/gerrit/gerrit-2.8.1-site/bin/gerrit.war *** SSH Daemon *** Listen on address [*]: Listen on port [29418]: *** HTTP Daemon *** Behind reverse proxy [y/N]? Use SSL (https://) [y/N]? Listen on address [*]: Listen on port [8080]: Canonical URL [http://192.168.251.90:8080/gerrit/]: *** Plugins *** Install plugin download-commands version v2.8.1 [y/N]? Install plugin reviewnotes version v2.8.1 [y/N]? Install plugin replication version v2.8.1 [y/N]? Install plugin commit-message-length-validator version v2.8.1 [y/N]? Initialized /opt/server/gerrit/gerrit-2.8.1-site ---------------------------------------------------------- |
中文支持
mysql 对gerrit中文支持
安装完成后,Commit Subject 中中文显示为“?”,查了下mysql,库里边就是乱码。
解决方法:
修改mysql服务器设置
修改mysql设置,在my.ini设置:
1 2 3 | [mysqld] character-set-server = utf8 character-set-filesystem = utf8 |
修改reviewdb中的character设置
gerrit-x.x.war init 出默认的数据库,参见安装步骤。
导出数据库。
mysqldump –opt -p -u root –port=your-custom-port reviewdb > reviewdb.sql
拷贝出reviewdb_utf8.sql,修改reviewdb_utf8.sql中latin1为utf8的设置。
- First replace: latin1_bin for utf8_unicode_ci ; this is the COLLATE latin1 value
- Second replace: latin1 for utf8 . Replacing this after the COLLATE operation near guarantees you won’t have “utf8_bin”, which we don’t want.
- Third replace: ENGINE=MyISAM for ENGINE=INNODB. This way, tables are recreated using INNODB, which actually also seems to be faster, though this might just be a placebo effect.
将新的sql导入数据。
1 2 3 | DROP DATABASE reviewdb; CREATE DATABASE reviewdb; mysql -u --port=7655 -u root reviewdb < reviewdb_utf8.sql |
参考
http://blog.csdn.net/yz2574648679/article/details/10362747
http://scn.sap.com/docs/DOC-42271
http://stackoverflow.com/a/8451748